Professional quality bullet terminals for automotive repair
Bullet terminal series for automotive repair
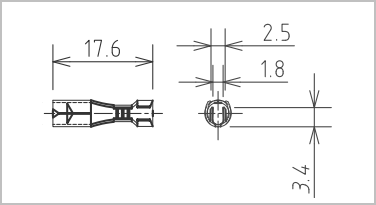
B-1/B-2,B-1-24K/B-2-24K
↓ How to Crimp Wire Bullet Terminals
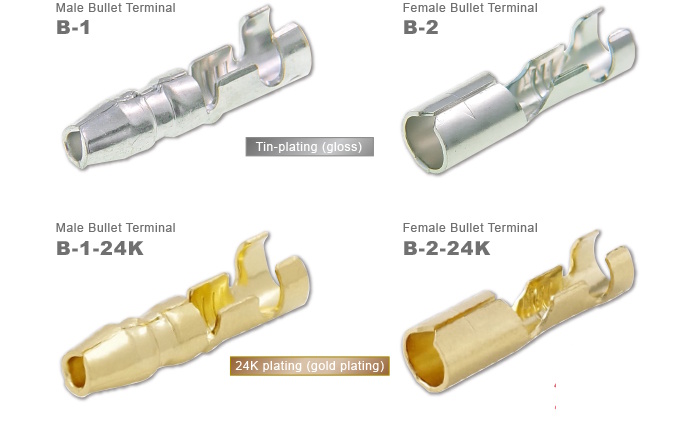
Engineered exclusively for automotive repair parts, our “B-1” and “B-2” series bullet terminals are built to endure the harsh conditions of the automotive environment. With a commitment to Made in Japan quality and fully in-house production, we deliver high-performance terminals that meet the rigorous demands of professionals. Our consistent use of domestic materials and in-house manufacturing ensures superior quality and reliability, earning high acclaim both in Japan and abroad.
"MADE IN JAPAN" – a mark of trust and reliability
Every stage—from design and development to production—is handled in-house, allowing us to achieve outstanding product quality and reliability. With over 50 years of proven performance, especially in the automotive aftermarket, our products are proudly Made in Japan.

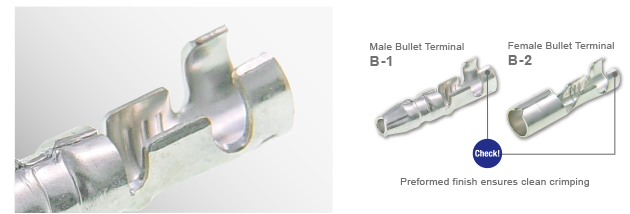
To meet the professional demands for both “quality” and “durability,” both male and female terminals are designed and developed in-house.
A professional-use model designed exclusively for automotive repair applications
Developed specifically for automotive repair applications, HERO Electric’s bullet terminals are designed with work efficiency in mind. As a specialized manufacturer of crimp-type repair terminals for the automotive aftermarket, we have infused our extensive experience into every detail of this professional-use model.
Designed for easy and secure connection/disconnection during maintenance. The locking mechanism can be released without damaging the wiring.
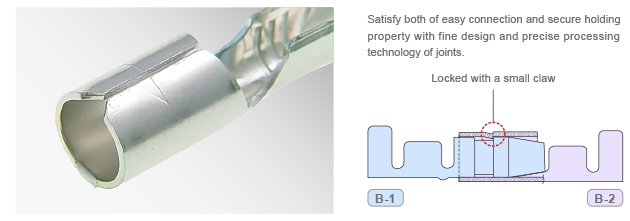
The terminals are pre-formed to ensure smooth crimping with hand tools, resulting in a clean and reliable finish.

Why Hero Electric "B-1" "B-2" can gain "trust" and "support" from professional mechanics ?
Comparison of Crimping Conditions: With Pre-Formed Terminals (Our Product) vs. Without Pre-Forming (Standard General-Purpose Product)
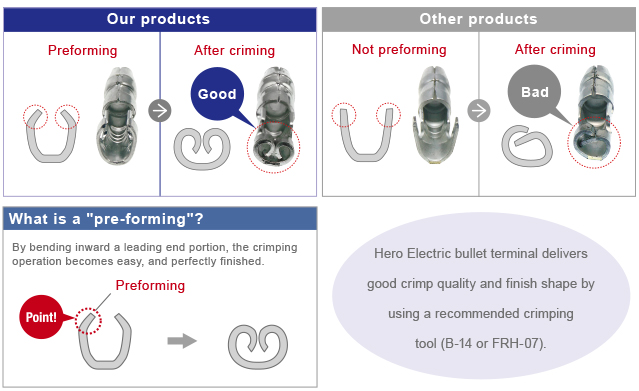
When you crimp electric wire to a terminal with a hand tool, you can preform the terminal to reduce the slope of the terminal, which is a weakness of the hand tool. This allows “light” and “secure” crimping, realizing reduced working time and a good finish.
Developed with a focus on maximizing performance
Designed for professional mechanics, our terminals pursue optimal electrical conductivity from the early development stage. Careful attention to materials, thickness, and surface area enables high-conductivity performance.
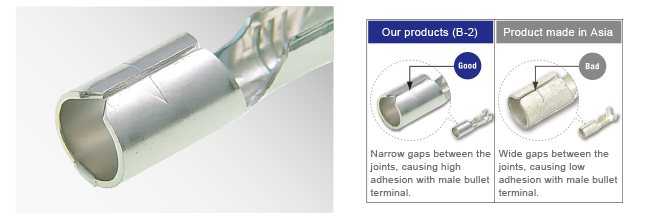
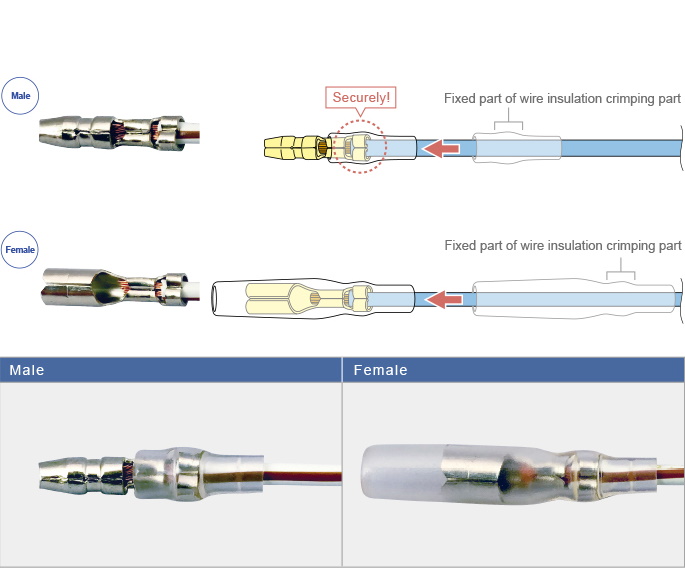
The female bullet terminal (Part No. B-2) is designed with a narrower seam and a larger contact surface area to enhance conductivity. This design improves the overall fit and contact area with the male bullet terminal (Part No. B-1).
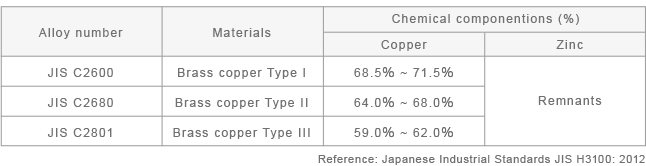
By increasing the material thickness, the terminal achieves both excellent conductivity and enhanced shape retention. In addition, we use Type 1 brass (Alloy No. JIS C 2600), which has the highest copper content among common brass materials, as the base material for the bullet terminals.

Chemical compositiions of brass materials
Meticulous Surface Finishing with Attention to Every Detail
To maintain high quality, even surface plating is carefully executed. Post-pressing, terminals are treated with either bright tin plating or 24K gold plating—ensuring not only the surface but also the cut edges are protected, helping prevent corrosion and maintain conductivity.
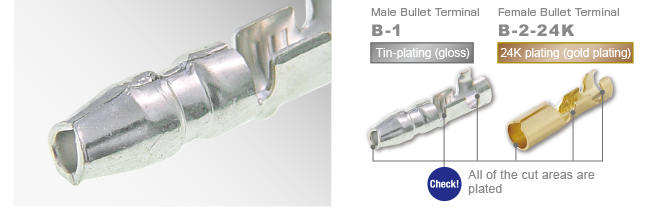
To prevent corrosion and oxidation—both of which can lead to decreased conductivity—plating the cut surface (end face) is a critical process.

Beneficial advice for crimping bullet terminals
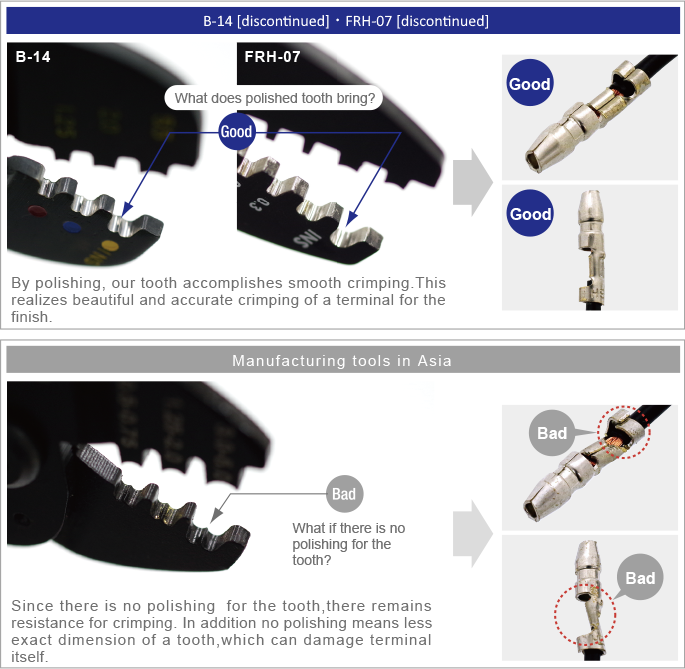
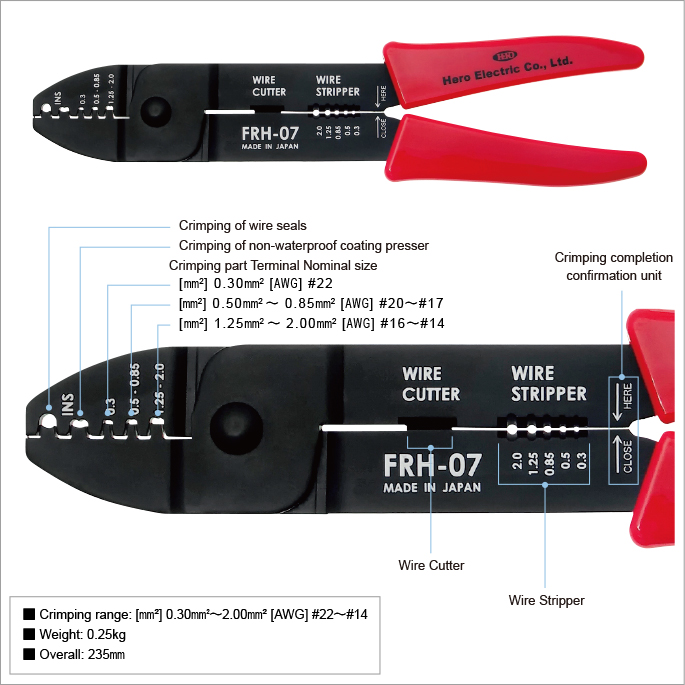
A crimping tool used for crimping terminals, as well as preform/non-preform of the product itself, has a significant effect on the good finish of bullet terminal crimping. Hero Electric crimping tool (B-14 [discontinued] and FRH-07 [discontinued] ) delivers smooth and reliable crimping by buffing the tooth form which influences the crimp performance.
| Photo | Product | Parts number | Specifications |
|---|---|---|---|
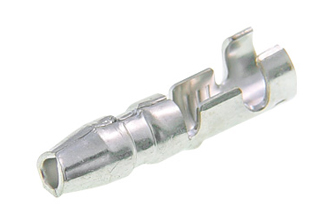 |
Male bullet terminal | B-1 | Applicable wire [mm2]0.50~2.00 [AWG]20~14 |
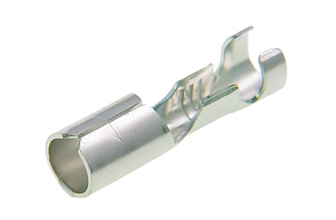 |
Female bullet terminal | B-2 | Applicable wire [mm2]0.50~2.00 [AWG]20~14 |
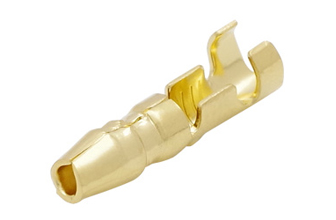 |
Male Bullet Terminal with 24K Gold Plating | B-1-24K | Applicable wire [mm2]0.50~2.00 [AWG]20~14 |
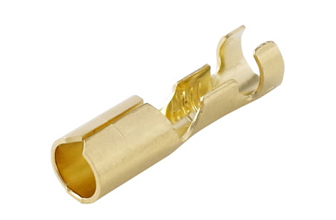 |
Female Bullet Terminal with 24K Gold Plating | B-2-24K | Applicable wire [mm2]0.50~2.00 [AWG]20~14 |
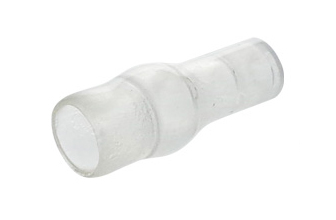 |
Insulating Sleeve | B-3 | Wire Coating Outer Diameter φ2.5㎜ |
 |
Insulating Sleeve | B-4 | Wire Coating Outer Diameter φ2.5㎜ |
 |
Insulation Sleeve (Post-Assembly Type) |
B-3A | Wire Coating Outer Diameter φ2.5㎜ |
 |
Insulation Sleeve (Post-Assembly Type) |
B-4A | Wire Coating Outer Diameter φ2.5㎜ |
 |
Insulation Sleeve (Post-Assembly Type) |
B-3AL | Wire Coating Outer Diameter φ3.5㎜ |
 |
Insulation Sleeve (Post-Assembly Type) |
B-4AL | Wire Coating Outer Diameter φ3.5㎜ |
 |
Waterproof Insulating Sleeve | B-3W | Applicable wire AV0.85 Wire Coating Outer Diameter φ2.5㎜ |
 |
Waterproof Insulating Sleeve | B-4W | Applicable wire AV0.85 Wire Coating Outer Diameter φ2.5㎜ |
 |
Waterproof Insulating Sleeve(S) | B-3WS | Applicable wire AV0.5 Wire Coating Outer Diameter φ2.2㎜ |
 |
Waterproof Insulating Sleeve(S) | B-4WS | Applicable wire AV0.5 Wire Coating Outer Diameter φ2.2㎜ |
 |
Waterproof Insulating Sleeve(L) | B-3WL | Applicable wire AV1.25-2.0 Wire Coating Outer Diameter φ2.9㎜ |
 |
Waterproof Insulating Sleeve(L) | B-4WL | Applicable wire AV1.25-2.0 Wire Coating Outer Diameter φ2.9㎜ |
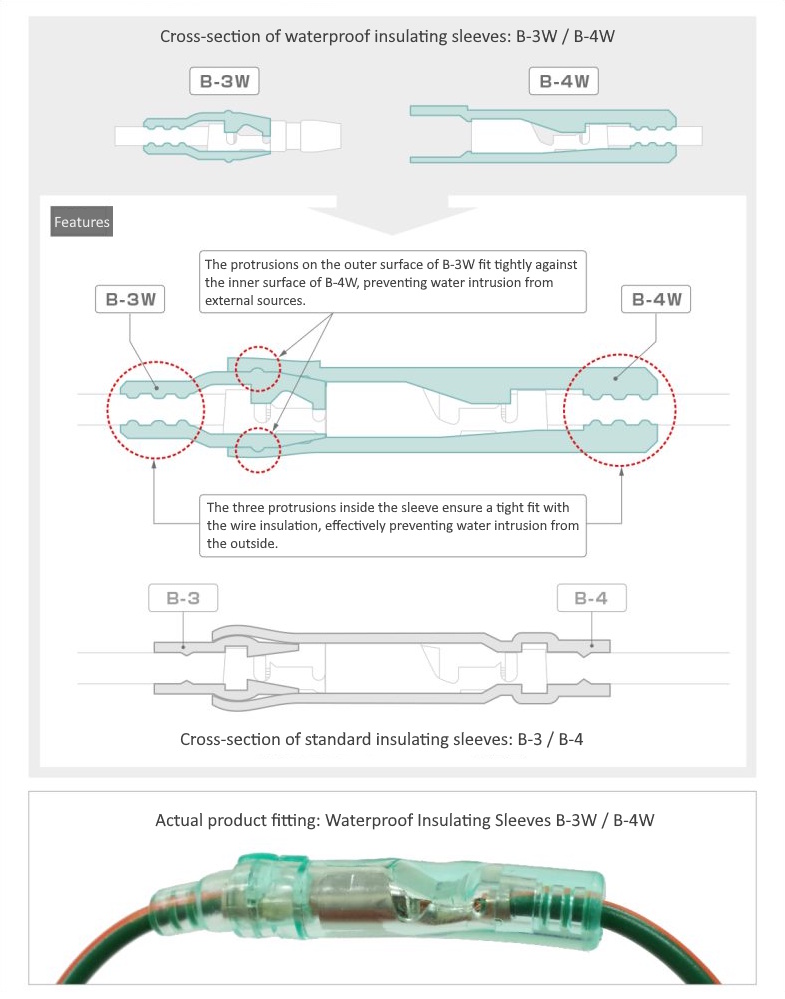
The internally contoured design of the waterproof insulation sleeve features a three-dimensional shape that allows it to closely fit both the wire and the mating waterproof sleeve, effectively preventing water intrusion from external sources.
Comparison: Waterproof sleeves (B-3W / B-4W) vs. Standard sleeves (B-3 / B-4)
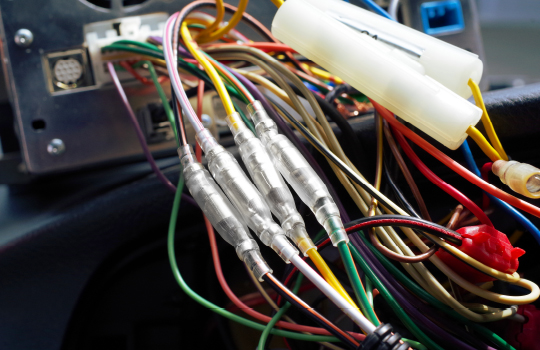
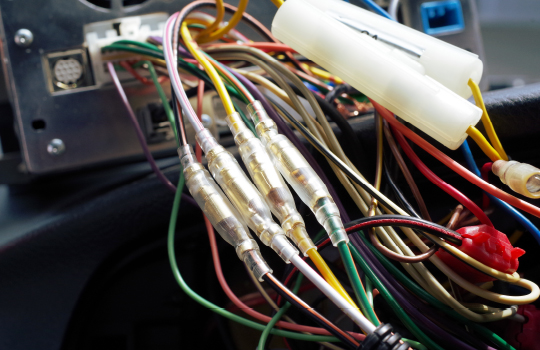
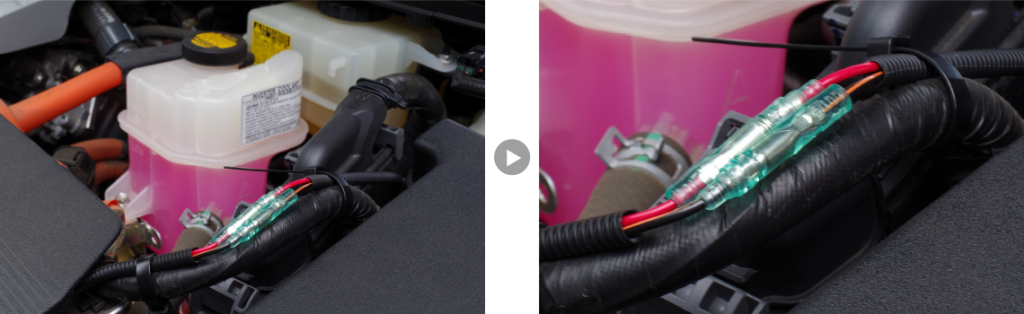
Product installed in a TOYOTA LEXUS [CT200h] (Model Code: DAA-ZWA10) with close-up view
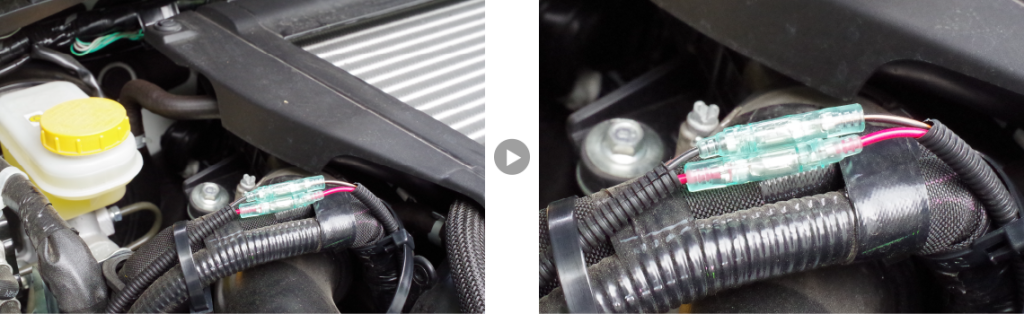
Product installed in a SUBARU LEVORG (Model Code: DBA-VM4) with close-up view
How to Crimp Wire Bullet Terminals in an Easy-to-Understand Way
In the past, wire bullet terminals and crimping tools were for professional use, but nowadays they are increasingly being used by the general public.
Crimping a wire bullet terminal requires proper knowledge and skills. Incomplete crimping can lead to poor contact and broken wires.
That's why Hero Electric has prepared this manual with the concept of "making it easy for anyone to understand".
This time, the male bullet terminal (Part No. B-1) is used as an example.

Step 1 : Preparing the product
There are two types of Hero Electric crimping tools that can crimp bullet terminals: FRH-07 [discontinued] and B-14 [discontinued] .The FRH-07 is used here.
FRH-07[discontinued]
Compatible product
 |
 |
 |
 |
 |
 |
| Male bullet terminal | Female bullet terminal | Male bullet terminal | Female bullet terminal | insulation sleeve | insulation sleeve |
| Tin-plating (gloss) | 24K plating (gold plating) | ||||
| B-1 | B-2 | B-1-24K | B-2-24K | B-3 | B-4 |
Step 2: Cutting wire when old terminal is still attached
The crimping tool is equipped with a cutter to cut the wire, so you can work without nippers or other tools.
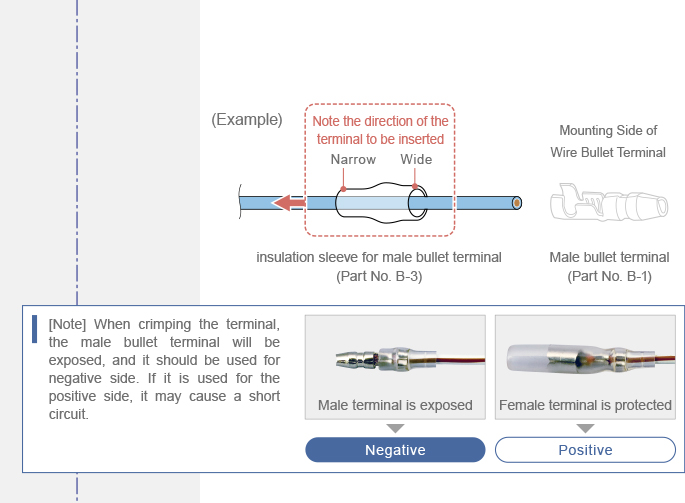
Step 3: Pass the insulation sleeve through the electric wire.
If the terminal is attached first, the sleeve will not be able to pass through, so the insulation sleeve should be passed through first. (In this manual, the male terminal is crimped at first, but you may crimp the female terminal first.)
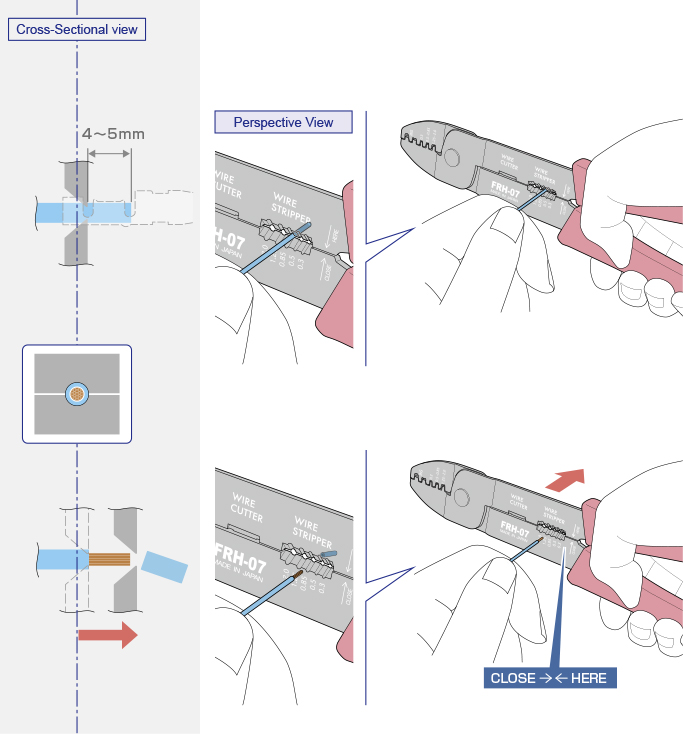
Step 4: Peeling off the INS (wire insulation)
Select the teeth according to the thickness of the core wire. The length of the INS (wire insulation) to strip should be about 1 mm longer (4-5 mm) than the crimped part of the terminal.
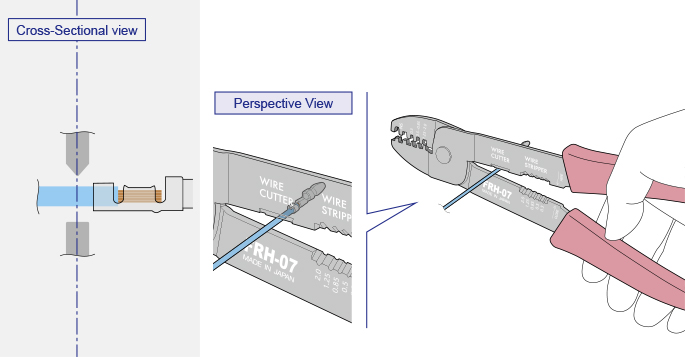
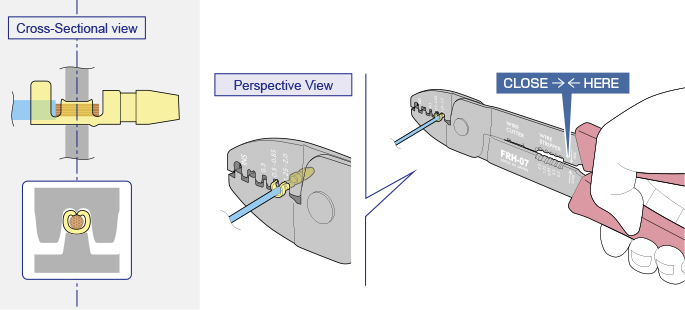
Step 5: Crimping the core wire of the electric wire (1)
Lightly pinch and fix the center of the wire core crimping part of the wire bullet terminal (Part No. B-1), and insert the wire into the wire core crimping part.
Step 6: Crimping the core wire of the electric wire (2)
Crimp the core wire by grasping the tool tightly until "CLOSE→←HERE" is closed.
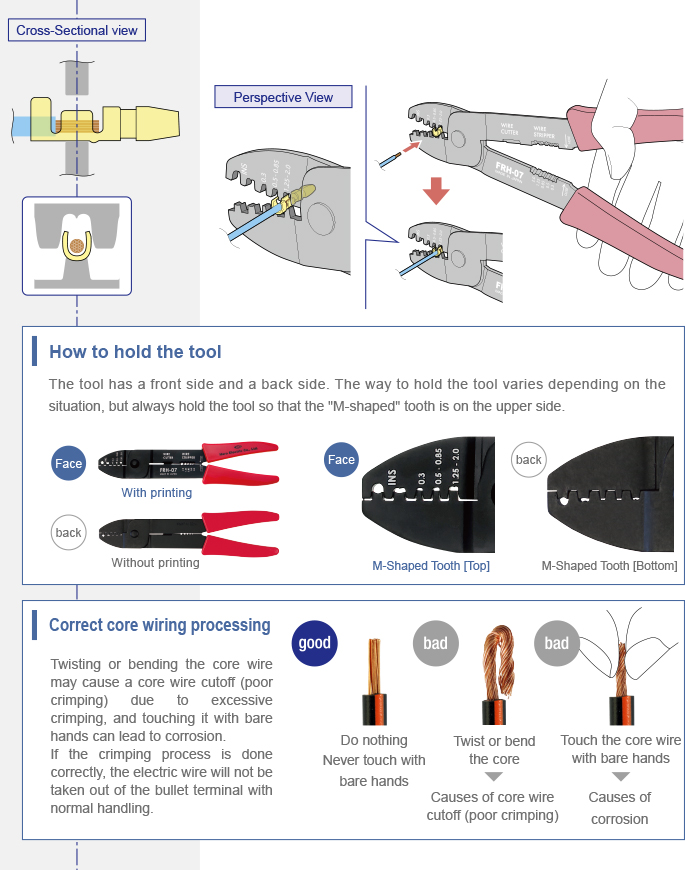
Step 7: Crimping the INS (wire insulation)
Crimp the INS (wire insulation) by placing it between the crimping teeth.
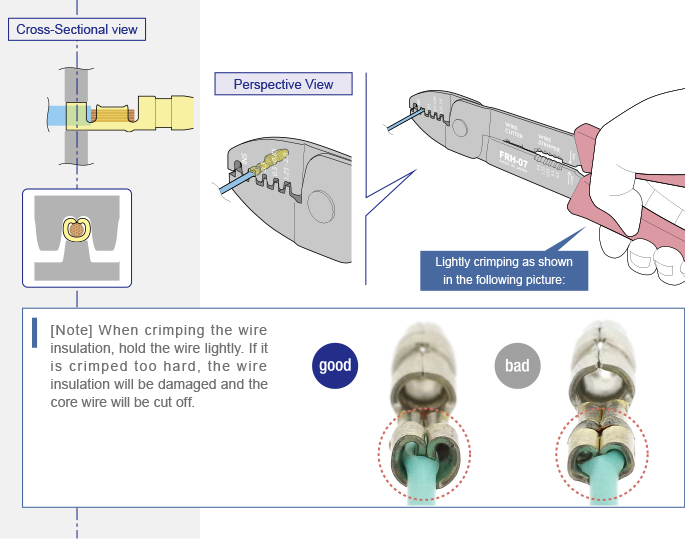
Step 8: Checking the finish and placing the insulation sleeve in a position
Insert the insulation sleeve into the terminal side. Make sure that the wire insulation crimped part of the terminal has been placed in the specified position for the insulation sleeve as shown in the following figure:
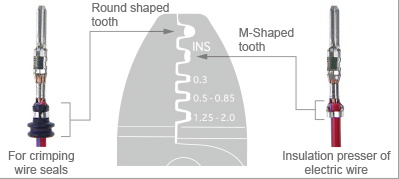
Crimping Tool "FRH-07" Two Types of Tooth shapes in the Wire Insulation Part
When crimping the insulation presser of the terminal onto the wire insulation, use the "M-shaped" tooth profile for the insulating part.
When crimping a waterproof rubber plug (wire seal), use the "round-type" tooth profile for the insulating part.